JUST DRIVE IT!
You can begin driving your trained, calm horse by simply running the lunge line through the stirrup on both sides and tying the offside line to the snaffle on the offside.
JUST DRIVE IT!
Several years back an eighty-year-old friend came to visit. Dave Bergen was a horseman of the first order, a Saskatchewan ranchman who had spent more time on his horse than in his pick-up. I had come to know a few horses that he had raised and everyone was respectful, friendly, and calm.
It was early spring, the snow was melting fast, and we were restless, eager to do something worthwhile. “You got a horse we can drive,” Dave said, “it's a good thing to do, makes’m a better horse every time.”
Like many old timers, Dave had spent little time inside of a round pen but that did not prevent him from creating well trained horses. We hooked up a young, Belgian cross saddle mare and Dave gave me lessons.
I was hooked. It did not take long see the benefits that came from driving the trail horse. He had begun a habit that continues to this day; driving all of our horses, once for some and once in a while for others. And I am eternally grateful for the habit. Good habits are hard to come by. Good habits help us take bites from the good apple of life, whereas bad habits just up and bite us. Driving your saddle horse is fun, easy to do, and useful. And like Dave says, it makes’m a better horse every time.
Before we study how to drive the trail horse and the benefits that it has for trail riding, it needs to be very clear that driving is not the first lesson that you give a horse. Forcing a horse to drive that has not been properly desensitized with saddles, lines and ropes, or placing a bit on a horse that has not learned to pack a bit or respond softly to a bit or giving cues to a horse that does not yet understand the meaning of those cues, is a short trip to mayhem. You must be sure that it is a learning experience, not an experience in confusion, fear, and flight.
So, do your groundwork in a round pen or with a lunge line first. Before driving your horse, it needs to willingly step out with a ‘cluck’ and stop ‘whoa’ upon command. It needs to take a saddle calmly and accept ropes around its legs and between it back legs and into the groin area. The horse must be calm with the trainer moving in and out of its space. If you are thinking, who needs drive training if the horse is that well trained already, then you need to be reminded that behavior on the trail is rarely as controlled as it is in a pen. The essence of trail riding is freedom; long distance travel, variable terrain and variable conditions, all of which gives the horse more freedom of movement, more freedom of mind, and a greater desire to take control of its own actions. As trail riders we need to use our dominance, our training, and our persistence to remind the horse that we are in control. This is where driving the trail horse helps us. The following problems can be improved or completely solved with drive training.
In past articles I have mentioned the importance of having the trail horse stand still as you mount it. We need to have a good look at why this is critical in a trail horse. Once upon a time, while reading an old book on horse training, I came to a section that was titled ‘Mounting the Moving Horse’. I did not know whether to laugh or cry. The idea of being satisfied with, or accepting, a trail horse that moves as you mount up, or after you mount up, is a behavior that an experienced trail rider would be unlikely to tolerate. A moving horse makes it difficult to mount; makes you more likely to lose the reins or control of the horse as you mount; makes it difficult to get off and retrieve something you have dropped on the trail; makes it more likely that your horse will take off on you as you get off on the trail; agitates other horses around you; makes the horse more likely to dance after you mount and when you want to perform some chore like eating a snack, studying a trail, looking at a map, etc; makes it likely you will get caught up in the lead rope if you are leading a horse; makes it likely you will get the lead rope of the horse you are leading caught under you saddle horses tail, which can send your horse into fits. And the list goes on.
Drive training helps desensitize the horse to lines and ropes around its feet. They get used to the feel of lines and this helps the horse accept trail situations where ropes come into contact with their feet, including a loose lash rope on a pack horse, picket lines for feeding, and dropped lead ropes. Completely respecting the rope and stopping when the drive lines are dropped will also help the horse stand calmly if they ever find themselves caught up in fence wire.
Trail riders often have difficulty with their horses respecting the ‘whoa’ command. The horse hears it so much and pushes the borders so often that soon it becomes an option, with the rider saying whoa five times over and hauling back on the reins again and again. As riders we often need to remind ourselves that we do not use the word ‘whoa’ unless we absolutely know that we are going to stop, if we want to slow down say ‘easy, easy, easy.’ Drive training reminds the horse that ‘whoa’ is absolute; not now but right now. Drive training also reinforces the concept that a ‘cluck’ or ‘walk’ means to step out immediately. It is also a good time to practice the command ‘back’ – by pulsing the reins back.
Many horses get it in their minds that the moment they put some distance between themselves and the rider they have the freedom to choose to obey commands or not, and often its not. With driving you are separated from the horse so when you give a command, ‘whoa’ for example, and the horse continues to walk, it is a big shock when you bump the reins and stop the horse abruptly. The simple fact that you command and control the horse from a distance elevates your status, your dominance, in the horse’s mind. Good stuff. This distance concept allow you to ground train the horse, meaning that you establish absolute stops then drop the reins and walk about, with the horse standing still for a few minutes waiting for your return. Being ground tied is a tremendous asset on the trail when you leave the horse temporarily to relieve yourself, check trails, clear trail, or perform a variety of tasks.
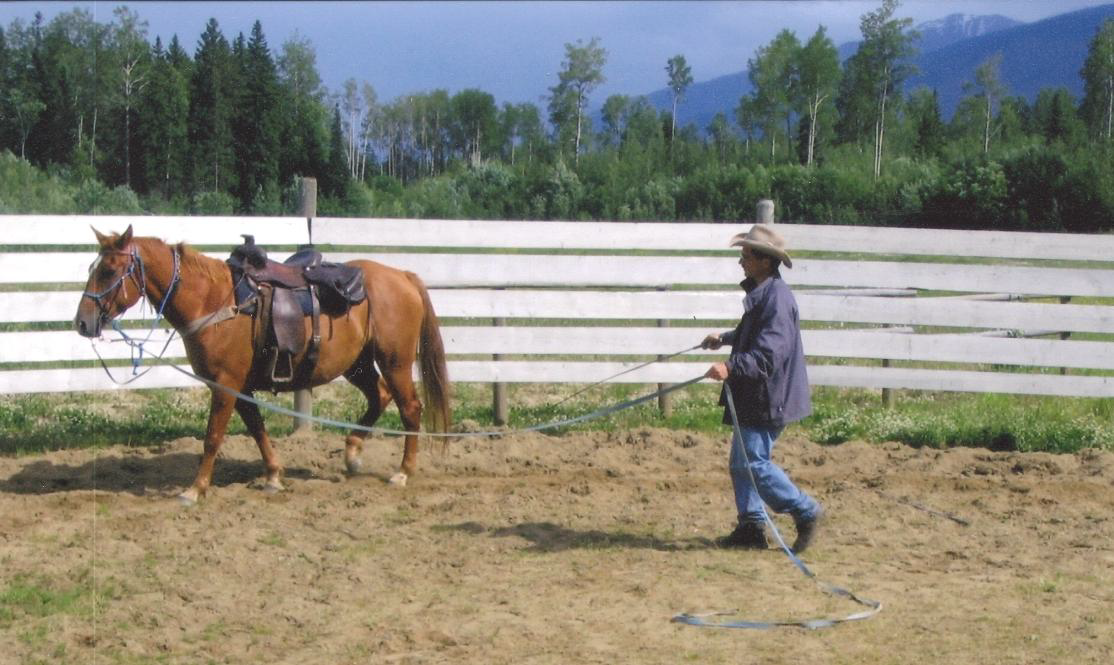
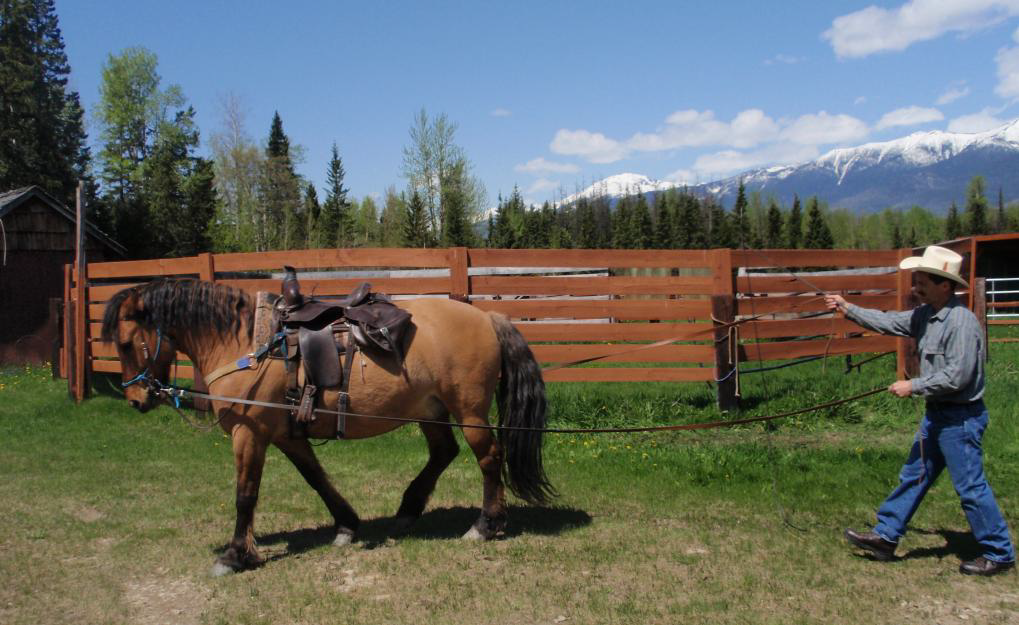
Your first drive is best attempted in a good size pen, preferably round but square will do. You can try driving for the first time out in the open but if you lose control you may have a runaway. Saddle and bit your horse with a snaffle, not a shanked bit. Use a snaffle bit that the horse is already comfortable with. Attach a set of light lines that are long enough to avoid being kicked, fifteen to twenty feet works well. Thread the lines through the stirrups and out the back. Threading them through the stirrups keeps them off of the ground and helps prevent the horse from stepping on them. If your horse does not stand well for these procedures and does not stand calmly as you walk in and out of its space then you need to back to basic groundwork to get to that point before continuing.
Take up a position to the rear and slightly to the inside, similar to where you might begin to lunge your horse but a bit closer to the wall (Note: the body position you want when you begin is the same as in the photo above, the only difference being you will have another rein on the opposite side of the horse and both reins through the stirrups). Because your horse has had round pen or lunging experience it will move forward when you cluck from this position. Cluck or say ‘walk’, snap your wrists and snake the reins, which should move the horse immediately. If the horse does not step out with the first command, then you need to use a training whip and touch the horse when you give the command. Do not give second commands. The horse must move with the first command. Command, no response, a light tap. Command, no response, a slightly harder tap.
When the horse steps out, move forward with it, staying slightly to the inside of the circle that you are turning. Do not ask for too much to begin with, just let him move out and follow behind with some slack in the reins. If the horse trots or runs out in a hurry, just let him go as if you were lunging him and when he stops, pick up the lines and begin again. It is a bit of an art to get the feel of the lines, and to keep them from tangling but it gets better with practice.
Once the horse has moved out without a great amount of fear and you are following behind you can bump him back to check his forward movement and slow him down. Do not pull back with steady pressure, pulses only, and more aggressive until he responds and slows down. Because the horse responds to whoa, you can give the verbal command and bump him back to a stop. When he stops, let him rest a minute so that he understands that it was the right thing to do. If he stands well then give him gentle rub as a reward before you continue.
It should not take long before the horse stops and starts efficiently, and you are able to leave the horse stand for longer periods of time before continuing (ground tied). Once the horse accepts the procedure, you can pulse on the inside rein and expect the horse to turn smaller circles to the inside. Remember, no steady, hard pulling, just pulses and bumps, whatever it takes. Work the horse in both directions so it will be accustomed to bit pressure on each side. You will likely find the horse more responsive on one side then the other, but this is normal. It may take the horse more practice to turn with soft pulses on his stiff side. Soon you will be able to drive straight and ask for turns in either direction.
It is very important not to ask for too much until both you and your horse get comfortable with the procedure. You will find it a challenge to keep even reins and an even, light pressure as you walk along, and you will find it a challenge to ease the pressure on one rein as you apply pressure and ask for a turn on the other rein. It will confuse the horse if you apply the pulse pressure on one side but do not release pressure on the other. The goal with all cues is to apply less pressure and get a better direct response, so as you continue practice the next day(s) you should be able to apply a lighter pulse and get the desired response. After a few sessions your horse will stand better, stand longer, and have more respect for your control. Precious stuff for the trail!
This horse has pressure on the lines as he is being asked to ‘whoa’. When moving forward the lines need to be relaxed. As with nearly all training, the physical cues need to be applied with pulses or bumps, never long hard pulls. Driving is excellent training for trail horses. It teaches them to stand at the whoa command and stand still until given the command to move; It teaches them to step out immediately with the ‘Hup’ command; It desensitizes their legs to ropes, which is important for all trail and pack horses; It teaches them to be ground tied when you drop the lines and they stay standing until given further commands.

A D ring snaffle is a good bit to begin training your trained trail horse to drive. It is not as likely to slide through the mouth as an O ring snaffle. Use a medium to thick mouthpiece, never a thin mouthpiece. Horses in training find a rubber mouthpiece friendly.