ACCESSORIES FOR THE TRAIL RIDER I
ACCESSORIES FOR THE TRAIL
RIDER I
I remember the trail rider, loaded and ready to head out for a ten-day adventure. I remember the saddle bags stuffed full and a spotting scope protruding from the top, not an uncommon sight as spotting scopes are often longer than the 10”X10” saddle bags. The trail rider’s return was even more memorable. He was not happy. “I lost my Swarovski spotting scope” he grumbled (over $2,000.00). “That saddle bag’s no damn good.”
Well, it wasn’t any good, not any longer, with the upper screws ripped out and the bag half torn off. “It was that way when I got it,” he said. Well, I knew it was not that way when he got it but I also knew that I had performed some emergency repairs on a saddle bag before the group headed into the woods. A saddle bag had been ripped from its screw, and the screw half out. I had made a new hole next to the torn one and re screwed the screw back in. This very well could have been that same bag. So, out of a sense of guilt I compensated him some for the lost scope. Sometime later he sent me a gift of fishing gear for our salmon fishing adventures. I was told that insurance also covered the loss.
Through the years many items have been lost from saddles, some to be found and some never to be seen again. Through more than forty years of trail riding I have lost movie cameras, knives, axes, clothing, who knows what, and damaged as much. Some of the loss can be attributed to fate, some to tough going, some pure bad luck, but often, my own careless behavior. The bottom line is that with a properly rigged trail saddle with quality accessories and well maintained, your time in the saddle will be more enjoyable because everything will be organized, accessible, secure, and there will be less damage to your gear.
Let’s look at how to outfit your trail saddle and horse in this article and how to outfit yourself in the next. Truthfully, the fifteen or so saddles in our outfit are not all rigged with all of the great ideas suggested in this article. We have made improvements over the years and continue to do so, but our saddles come and go, and that fact combined with time and money keeps them from being ideally and perfectly rigged. It really is a pleasure to see a rider with a well rigged, quality trail saddle. So let’s continue with a look at those saddle bags.
Why did they rip out at all? The reality is that trail riders go through some tight places. Trees, branches, and even other horses constantly push, bang, shove, and poke at anything protruding from a saddle. It makes sense then that the bigger and the heavier the bags are, the more likely they will be abused, and you would not believe how often overloaded bags get ripped and how often trim bags come through fine. Personally, I like a good-sized bag about 9X9 to 11X11 inches across, handy for light objects like toques, gloves, a lunch, and what have you. On the negative side, large bags are tempting to stuff to bulging, like a bloated elephant, trouble is, they are not as tough as elephant hide. But they need to be as tough as possible. Quality leather and corners should be reinforced with rivets. Quality leather comes in light medium and heavy weight and we prefer the back side of the bags to be heavy in order to prevent holes from ripping through. Avoid thin, split grain leathers. My grandmother could tear apart some of these cheap saddle bags with her bare hands. On the other hand, it is a wonder how tough quality, properly conditioned leather is, and how many years of reliable service they can provide. Keep in mind that this leather spent a lot of years keeping that big old cow to the inside.
Quality leather is less likely to absorb moisture than poor, coarse leather, and so it dries quicker, keeps items inside drier, and is much slower to rot over the years. There are a variety of synthetic saddle bags on the market but generally they do not protect the gear as well as leather and tend to come apart at the seams or corners sooner than leather. It is a little surprising that someone has not come up with a super tough synthetic bag, tougher and cheaper than leather. We did make a synthetic bag that was reasonably tough when reinforced with nylon webbing.
Whether the bag has two buckles or one is somewhat personal. The buckles need to be good quality and need to be secured well as straps tend to pull out. Two buckles will hold gear in better but I find having to undo two buckles each time I want to dig into the saddle, which is often, an inconvenience, so I prefer one. The rain flap needs to be wider than the bag at the ends to keep out rain. A small D ring at the bottom forward corner of the bag with a tie string attached allows you to loop the string around the billet and keep the saddle bag from flipping up. It also takes the pressure when being battered about so the screws are less likely to pull out or the bags rip.
When your screws do come out of the saddle skirt and tree you can reset them by using a larger size screw with some epoxy. If it is a plastic tree then try a size larger screw and a plastic glue. If the screw holes have been repeatedly damaged then you can drill right through the tree with a small drill bit, with the two holes about two to three centimeters apart and secure the bags with conchas and leather lacing. This may weaken the tree somewhat, particularly a plastic tree. The lacing that shows in the saddle lining needs to be pounded flat, so as not to protrude against the horses back.
Horn packs can be handy for small items like cameras. Because I am constantly leading other horses I do not want extra items around my horn and so I have not got in the habit of using them, although they are really not overly bulky. A rider needs to draw a line with the amount of ‘stuff’ they carry on a saddle. And when you see stuffed saddle bags, horn bags, and a big cantle roll, you really have to wonder if all this stuff is necessary. And when you see experienced riders who have travelled trails of all conditions for years, with half the stuff – trim saddle bags and a tight cantle roll consisting of a jacket and rain slicker, you begin to get the idea that some riders should have an ‘L’ slapped on their horse’s rump for “Learning Driver’. The next article will cover what we put in those saddle bags.
Once in a while you see those self-contained cantle packs that allow you to put a variety of smaller items in them, but again, if your cantle pack is basically a tight roll with a warm coat protected by your rain slicker, or rain slicker only, there really is no need for the cantle unit. Roll your cantle roll on the ground in a manner that sleeves, legs, and edges of clothing are tucked in and tied tight with a cord, then lay it behind the cantle and tie it with the saddle strings. Saddle strings should be long and good quality leather. The years of use and abuse that saddle strings put up with without breaking is amazing, and testament to the strength of leather. I have tried various types of cord as saddle strings, but they just do not have the friendly feel of leather and the knots do not bite as well.
In western movies it is common to see the salty old bandit toss his saddle bags, laden with ill gotten bounty, on to his saddle then tie it on with the strings only, and sometimes modern day cowboys or wanabee cowboys do it, but for trail riders who ride bush trails it is a recipe for ripped off saddle strings and lost or damaged gear. Use all four attachment points to properly secure those bags. You see saddles with long tie strings hanging from about every place possible. They look pretty but I am not sure what should be tied to them. I do know that tying jackets and other loose items to side strings results in items falling from the horse and getting lost, falling and spooking horses, and getting caught up in brush and being damaged or ripped off. Having said that, occasionally when you need a place to hang something, like maybe an overly warm jacket, they may be handy.
Many trail riders carry a ¾ length trail axe or a trail saw on their horse. Axes need to be sharp to be effective and safe, and so they need to be sheathed with a good sheath. A good sheath to me means that it is sturdy, a simple design (quick to remove and return the axe), and easy to remove from the horse. The blade edge should be riveted as the blade can cut sewn sections. Because your sheath is removed often it is a good idea to give it some bright color or flagging so that it does not get lost in the grass. I wrap a few turns of red tape around our sheaths and axe handles. We have a long leather strap on our sheath and simply loop the axe over the horn, and a loop that hangs down from the rear cinch ring that the handle is slipped into.
You may have a personal preference on where you position your axe or gun scabbard. We attach our rifle scabbards in a similar manner, with the butt forward and high on the ‘on’ side. Easy to get at when you are in the saddle or dismounted. Try to avoid rifle scabbards that are big and bulky. A thick lining in a rifle scabbard is not necessary and just adds to the bulk under your leg. Scabbards should be hung low enough so that they are just below the midpoint of the barrel of the horse and not forcing your leg uncomfortably out, and high enough to not drag in brush and debris. There are some decent synthetic rifle scabbards on the market but for long lasting durability and protection leather is still the popular choice. Synthetics have gained popularity because they are one half the price of leather, but they are often too bulky and wear out after a season of abuse. You may want to keep an eye on the used section for a deal on a quality leather scabbard or saddle bags. With leather accessories it is generally true that you get what you pay for.
My rifle is a short, large caliber, stainless leaver action, and I prefer to use a shorter scabbard with the butt protruding. A properly treated full length scabbard with a butt flap will keep your firearm dry and twigs and debris out of the scabbard. It seems that, one way or the other, debris does manage to get into a scabbard and inadvertently into the end of a gun barrel, so tape a small piece of electrical tape over the end of your gun barrel while on a trail ride. It will not affect accuracy.
Things can get crowded on a saddle horn with a scabbard, sheath, cantle packs, and lead rope dallied around it. You can take some of the bulk off by attaching a large ring to a forward side string and tying off your riding horses lead to it rather than around the horn. On a trail saddle, particularly one that is used to lead other horses, the horn leather can get worn, loosened, and damaged. Protect the horn leather with an additional wrap of leather or rubber tubing sliced from and inner tube.
The stirrups that trail riders prefer are often wider than pleasure riding as trail riders often combine a good bit of walking with riding. Since walking in rough terrain requires some type of hiking boot, wider than a riding boot, and with aggressive soles, a wider stirrup is needed to be safe, and safe means being able to quickly remove your foot in difficult moments. The preferred shape of the stirrup is somewhat personal but avoid really slippery material for the footrest, like plastic. In wet or frosty conditions your foot slips so badly that it can be difficult, and dangerous, to mount. We have used rawhide covered stirrups and under dry conditions they are tough and wear longer than leather, however one rainy season is enough to soften and ruin them, so we generally stay with traditional leather wrapped stirrups.
Stirrup hoods, covers, or tapaderos are an excellent addition for trail riders. They prevent your foot from penetrating the stirrup too far and therefore help prevent a foot from getting hung up, and they protect your feet from the weather and wear. Your feet feel warmer in cold weather. And perhaps most important, and you will understand if it has happened to you, they prevent sticks from getting jammed into the stirrup, sticks that can jam into the horse’s gut or pin your foot, and you, into the stirrup. Many serious injuries have resulted from sticks being jammed into a stirrup or between the back cinch and the gut. You do not have to spend big dollars to buy fancy tapaderos but simply cut out a simple pattern from heavy leather or even heavy rubber from tractor inner tube and attach it with small screws.
And this is a reminder to have a back cinch on a trail saddle. Whether it is to help secure the saddle bags or to help stabilize the load, a back cinch is used on all our trail saddles. With all the twists and turns and jostling and jumping that a trail horse does, a back cinch reduces saddle movement, and reducing movement is always good. Similarly, a chest strap also helps reduce saddle movement. For some horses and mules that lack wither or have rounder backs or carry large riders, adding a crouper will reduce slippage.
While watching an old John Wayne western movie the other day I noticed a horse standing tied to a rail in front of the Sheriff’s office. The horse was just standing around waiting for the next scene, but its chest collar was so tight it was digging into the horse. Chest collars, back cinches and croupers need to be adjusted properly. Chest collars and croupers should not be engaged until there is displaced movement of the saddle. When the horse is resting and you pull the chest collar or crouper away from the horse there needs to be two to three inches of space for slack. The back cinch needs to be snug on a trail horse, maybe half the pressure as the front cinch, and kept that way as the day wears on and the gut shrinks. I was somewhat miffed when John walked past the horse and did not adjust the chest collar properly.
Many trail riders like to take breaks during the day and hike off for a time, or head for a certain spot, tie up, and see what is over the rise, across the valley, or biting in the lake, and they like to keep a day pack with them. Sometimes long days and more gear and food require more room than available in the saddle bags. Again, a small day pack is used. Often, guides will keep a day pack with them and often they will have the pack on their backs. Each to their own but I do not like a pack bouncing around on my back all day, particularly when I like the freedom that sitting on a horse with nothing but me gives me. And I want to be able to move freely and quickly when I get on and off and need to do a quick fix. For an alternative, try hanging the pack on the saddle horn, down on the offside. There is often a small loop on the top of a day pack and it adds no bulk on the horn. Its weight will often balance the weight of an axe or firearm on the on side. Avoid using a larger pack while horse riding. Always be sure to balance your load on either side of the riding saddle, and if you are somewhat side heavy, keep it to the offside so that when you mount and dismount its weight off sets your weight.
I do not know whether you consider a lead rope and halter a trail riding accessory but if you are using a three-quarter inch diameter eight-foot lead then try switching to a one-half inch, ten-to-twelve-foot lead. It is less bulky around the horn, will allow you to tie up around big trees and bushes, do some on the trail short line lunging, if need be, and be long enough to lead or pony other horses. And I have said it many times before, if you have not tried a light, well fitting, quarter inch, double braid nylon rope halter as your trail riding halter, you are missing out.
I hope there have been some use full ideas here. Your trail ride will be more enjoyable with a well set up saddle that is trim and tidy with all the unnecessary items left at home. More stuff means more hassle and more trouble. The only thing worse than finding your saddle bags or lacings torn off or a jacket or water bottle lost on the trail is having to go back to try and find it. After one long day we got to our long-awaited camp spot, only to discover a
small backpack tent had fallen off somewhere. The next morning it became clear that it would be a long trip without it so I headed back to find it while my buddy continued on the journey. I went back, all the way to the previous night’s camp. I caught up to my buddy late that night. You know what is worse than losing something and having to go back for it? Losing something, putting in about three days worth of travel in one day trying to find it, and not finding it. HAPPY TRAILS!
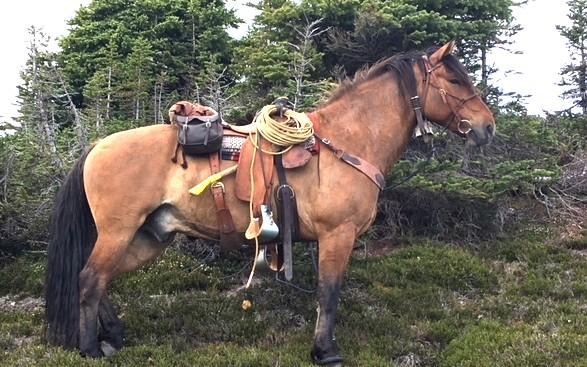
The importance of quality saddle accessories becomes very apparent when you are 5 days in and one a one-month wilderness journey. Torn saddle bags, broken saddle strings, a lost axe, are a big deal. The gun scabbard is in my preferred position as it is accessible if you have to bail off quickly.
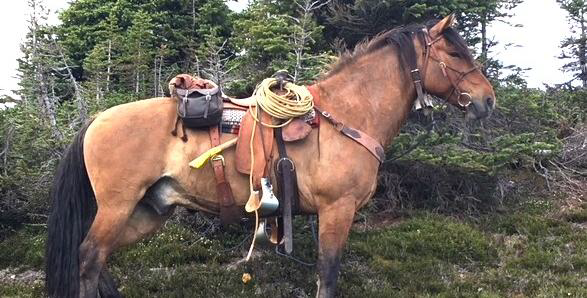
It’s all here - quality saddlebags attached at 4 points, oversize stirrups, good axe and scabbard properly attached, long distance bell. Lariat not necessary.
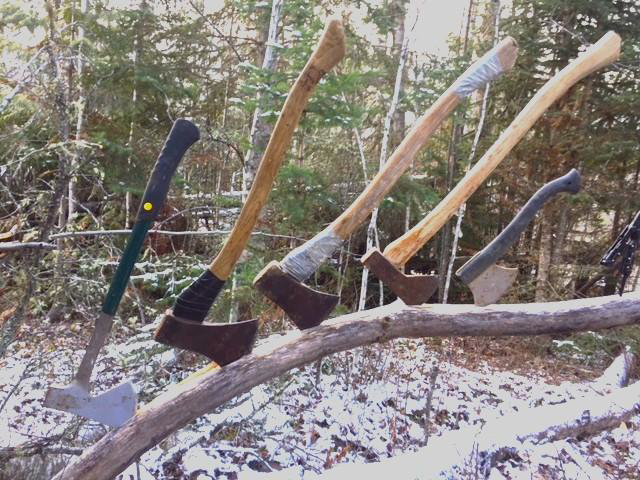
You need a trail axe, not a splitting or a pole axe design. Trail axes are often a loggers limbing axe, a three-quarter length handle, a thin blade for slicing through branches when clearing trail and chopping through logs, and a broad bite. Try the feel of various handles. Not too thick or clubby. Hard to beat the warm feel of wood, often a close grain quality oak.

You might not consider a small backpack a saddle accessory, but it is, if it is where it belongs - hanging on the offside from the saddle horn. From there you can remove items as you ride, and it protects your legs as you push bush, as opposed to being a weight and a nuisance on your back, particularly when mounting and dismounting. Very unnecessary. You already have all you need in your saddle bags and cantle roll, so keep items in the SMALL backpack to 5 pounds. When I see 200 pound plus riders with a 30-pound pack on their back riding down the trail I feel like jumping off my horse and giving them a slap – the rider, not the horse, who is already suffering.